10 Top Tips For Plumbing In a Washing Machine
May 5, 2016 | Washing Machines | No comments

When moving house plumbing in the washing machine is one of many chores on the to-do list. If you’ve bought a brand new machine the company delivering it will usually offer to plumb it in for you… for a price. But we of course recommend plumbing it in yourself!
It’s not too hard after all, providing the connections are already set up under the sink which they usually will be. You just need to attach the fill hose to the cold water pipe behind the sink so you can fill your machine with water and the drain hose under the sink to drain the waste water. A few machines will also require you to attach a second fill hose to the hot water supply, but we recommend avoiding buying these washing machines if possible, not because they are slightly harder to fit, but because they are less energy efficient.
If you’ve never plumbed in your washing machine before or you’ve ever encountered problems doing so, here are our top tips to make the job easier.
1. Tape Up Hoses
Before moving your old washing machine, either to transport it to your new home or to the dump tape the loose hoses to the top of the machine. This will help protect the hoses from damage and stop any water left in them to spill out in the removals van or over your floors.
 2. Check the Drain Pipe
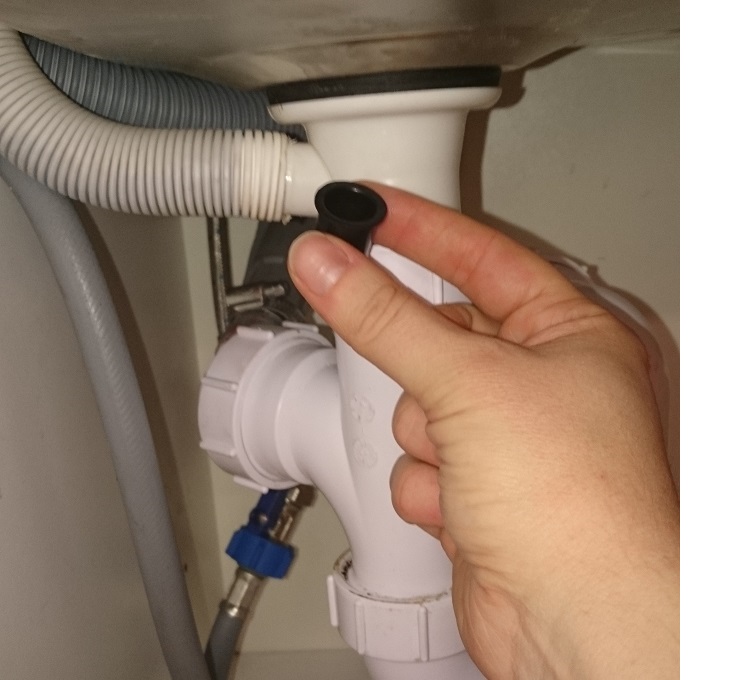
Check the drain pipe connection under the sink is clear. There may be a build up of fatty residue from the sink, or a cap inserted to stop water leaking out whilst no washing machine is connected. Remove it; otherwise your washing machine won’t be able to drain.
3. Keep the Cap Safe
Tape the aforementioned cap to the U bend under the sink so if you ever move house again or move the location of your washing machine it’s easy to pop it back in.
4. Remove the Transit Bolts
Make sure to remove any transit bolts at the back of your machine. Transit bolts lock the washing machine springs in place whilst it is transported to avoid damage to them. However, if the bolts aren’t removed before you start your wash the drum won’t be able to move freely when the washing machine is on a spin cycle. This could lead to your washer bouncing around your kitchen quite violently, possible damaging your kitchen worktop or the machine itself.
The delivery person may have removed the bolts for you, but double check and if so ask to keep them so you can use them if you ever want to move your machine. Keep them tied in a bag at the back of the machine for convenience.
5. Clean the Pipes
Clean the water pipes with metal wool before attaching the fill hose(s) to help ensure a good leak free connection.
6. Avoid a Wobbly Machine
Make sure the washing machine is level – a machine that wobbles will shake more when spinning and be noisier too. You can use a spirit level or spirit level app to check and adjust the washing machine feet as necessary.
7. Don’t Over Tighten
Don’t be overzealous when tightening the hoses! Some people think pushing the hose on extra hard will make sure it won’t leak, but ironically over tightening can actually cause leaks by cracking the hose.
8. Perform a Test Wash
Run the machine once before putting it back in position to make sure there are no slow leaks. Small leaks don’t produce enough water to seep under the machine so could go unnoticed a long time and could damage your floor or machine itself. If there is a leak ensure connections are sufficiently tightened and the hoses are intact. Hoses with holes or tears will need replacing and you could even invest in a flood proof hose to prevent future leaks.
9. Don’t Squash the Hoses
Make sure you don’t kink or squash the hoses when returning your machine to the correct position.
10. Tie Up the Drain Hose
Lastly, if the drain hose hangs down from its connection under the sink waste water from the sink could run into it. Make sure the hose is tied or hung up to avoid this.
Once you’ve got your machine up and running you can tick it off on your to-do list, but if you notice it’s not smelling lovely and fresh you can take the opportunity to clean it too with these four easy steps.
Tags: install, plumb in, tips, washing Machine
 Three Ways to Open a Locked Washing Machine Door
If your washing machine door has jammed shut you need to find a fix fast. Leaving your damp clothes in the machine will cause your laundry and ...
Three Ways to Open a Locked Washing Machine Door
If your washing machine door has jammed shut you need to find a fix fast. Leaving your damp clothes in the machine will cause your laundry and ... The Best Ways to Safely Wash Your Football Kit
The football season has arrived, and so has the time to wear your country's colours. But, with that being said, do you know how to properly car...
The Best Ways to Safely Wash Your Football Kit
The football season has arrived, and so has the time to wear your country's colours. But, with that being said, do you know how to properly car... We Look At Real Washing Machine Innovation Most leading washing machine manufacturers are committed to continuous innovation. Every time a new product hits the market, there seems to be an a...
 What To Do If Your Washing Machine Doesn’t Drain
Have you noticed your washing machine is emptying slowly or not emptying at all? Drainage issues are one of the most common issues to develop w...
What To Do If Your Washing Machine Doesn’t Drain
Have you noticed your washing machine is emptying slowly or not emptying at all? Drainage issues are one of the most common issues to develop w...